Saturday, December 5, 2015

Look Kevin, I Can Do Scrappy! Final Reveal!!!

Wow, I can't believe it's been 6 months already! I hope you're all ready for my big reveal of my Mystery Quilt...

But first, Some other news. As you know, I will be teaching at MQX New England (Ann's Classes) in April and at MQS Cedar Rapids (Classes, scroll way down to find me) in May. I will be teaching a Ruler/Template class at both. We will be discussing lots of rulers by lots of vendors. Rulers are my Quilting Passion and I can't wait to share lots of information with you all. Things like, how to hold, what all those lines mean and especially, what else can we do with them. We'll also be looking at some of my favorites and discussing why I like them, with lots of tips and tricks thrown in.

So, to make things a little more interesting and because I am always looking at new ways to use a ruler, I have decided to have a couple 'contests' for my students. I will be, at random, posting pictures on Facebook of designs using various SECRET, unidentified rulers. Don't post your guess in the comments, save them for class. For every ruler you guess right, you will put your name into the drawing for a prize.

Ok, now on to the Mystery Quilt, the Final Reveal....


Month 6—Putting it All Together!

This month you will be putting the quilt together. We will be sewing the blocks in rows, then the rows together to make the quilt.
You will need all of the blocks!

Make 2 of each of these rows —

Rows 1   and 13


 Rows 2   and 12


 Rows 3   and 11


 Rows   4 and 10


Rows 5   and 9


Rows   6 and 8


Row 7—Make 1, this is the center row.


Sew the rows together, pay attention to the orientation of the rows. 1 and 13 may be the same, but the top edge of row 1 is the bottom edge of row 13. Measure the sides of your quilt and cut 4.5” strips from 2 fabrics for each side. Sew on the side borders. Press to the border fabric. Measure the top & bottom of your quilt and cut 4.5” strips from the remaining 2 border fabrics. Sew on the top & bottom borders. Press to the border fabric.  (I had lots of fabric and decided to make mine 6" borders cut at 6.5")

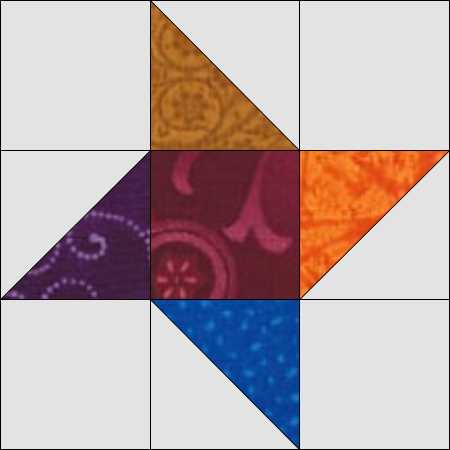
LOOK KEVIN, I CAN DO SCRAPPY!!


I hope you enjoyed the Mystery and I can't wait to see pictures of your finished quilts!

Happy Quilting,
Ann


Monday, November 9, 2015

BIG News!!! and Look Kevin, I Can Do Scrappy, Month 5

BIG, BIG, BIG NEWS!!

If you felt the Earth move, that was me doing the Happy Dance! I am excited and over the top happy to announce my teaching engagements for next year. I don't know where to start, so here they are in order.

In January, I get to return to Hunter Heirloom in Warrensburg, MO. I just love Amy and Joe the owners, they are so easy and fun to work for. I will be teaching hands-on ruler classes(s), a feather class and a background class. Check with Hunter Heirloom for dates and times.

April 6-8, I will be heading to Manchester, New Hampshire to teach at MQX, New England!! I will be teaching a Hands-on Feather class, a Ruler lecture and a Background lecture! To see my classes visit the MQX site "Ann McNew Classes" and register soon, classes are filling up!


Since I have never been this far east, we are turning this into a vacation, Some sight seeing on the way out, including a trip to visit my friends Dusty & Stephanie Farrell from Country Stitchin in Cambridge, PA! Then some Civil War sights on the way home.

May 10-14 I will at MQS Classes in Cedar Rapids!!! I will be teaching on Tuesday, a hands-on background class and a Ruler Lecture. The rest of the week, you will find me either in Dusty's classes (that cute little assistant in the back...lol) or helping in the Country Stitchin booth, or wandering around spending money.... If you are a member of IMQA, you can register for classes now. Again don't wait too long, classes fill up fast and I would love to see you in my classes!


That;s my schedule so far, but there is more in the works......

Look Kevin, I Can Do Scrappy

As we start Month 5, remember - each month's directions will be posted on the 2nd Tuesday of the month, for 6 months.  If you or your local quilt guild would like to use my pattern for this Mystery Quilt, please feel free.  You have my permission to make copies for your guild. All I ask is that you give me credit for the pattern  If you would like it in PDF format, please email me (atticthreads@yahoo.com) and I will add you to my email list.

If you missed any -       Month 1             Month 2             Month 3            Month 4
                                                  
                                     Month 4 Correction

A Little More Challenging Piecing!

This month you will be doing more chain piecing. My only rule for myself was to not worry about my fabrics looking good next to each other. (ok, so it still couldn’t be same fabric used twice in a block…) Just grab and sew.

Marcia’s Rising Star

You will need all of the half square triangles (HST)
96 of the light 2.5” squares
24 of the dark 2.5” squares

I chain piece all of the sets, cut apart and then press.

Sew a HST to opposite sides of each of  24 dark squares. Press to the dark square. (A)

** Pay attention to the
        Orientation of the HST’s***

Sew a light square to opposite side of 48 HST’s. Press to the light square. (B)

** Pay attention to the
        Orientation of the HST’s***

Sew a (B) strip to each side of an (A) strip. Make 24 star blocks.


Now, aren't you glad you made all those pesky HST?

The end is in sight! Next month we'll be putting it all together.

Happy Quilting,
Ann

Monday, October 19, 2015

Look Kevin, I Can Do Scrappy - Month 4 - Correction

Month 4—CORRECTION!

It seems no matter how many times a pattern is read and no matter how many pattern testers you have, there is always one step that ends up a problem. It was brought to my attention that there are not enough light-dark-light 2.5" strips to complete the 8 9-patch sets. I apologize for this. But, since this is a totally scrappy quilt, we’ll just go back to our scrap bags, (or left over jelly roll strips) and complete our blocks!

Nancy’s Takin’ it to the Nines

You will need to cut 3 dark and 6 light 7.5” strips

Always press to the dark.

Make 3 sets of light—dark—light.


Cut each set into 2.5” strips


                  Use these light-dark-light strip sets to complete these 8 blocks.


Tuesday, October 13, 2015

Mystery Quilt Month 4 - Look Kevin, I Can Do Scrappy!

Before we get to the Mystery Quilt, I just wanted to repeat how happy I am that I will be teaching at MQX New England next April. The classes are not listed yet, but visit the website often for future updates!  MQX New England


I will be teaching 3 classes, a hands-on Feather class, a Ruler lecture, and a Background lecture/demo. If you are anywhere near Manchester, New Hampshire, come see me. I love meeting Quilters and making new Quilty friends! 


Welcome back to my Mystery Quilt, "Look Kevin, I Can do Scrappy!"

Four months in and I'm still excited to say, "ALL OVER THE WORLD!!" Quilters are stitching those pesky 1/2 square triangles thanks to me.  Ok, once again, maybe not just because of me, but we do have an increasing number of quilters participating in our Mystery. A guild in Canada has joined us! So keep making those 1/2 square triangles, you will need them next month. 


I'm still waiting for more fabric pics......

As we start Month 4, remember - each month's directions will be posted on the 2nd Tuesday of the month, for 6 months.  If you or your local quilt guild would like to use my pattern for this Mystery Quilt, please feel free.  You have my permission to make copies for your guild.  All I ask is that you give me credit for the pattern  If you would like it in PDF format, please email me (atticthreads@yahoo.com) and I will add you to my email list.

If you missed any -       Month 1             Month 2             Month 3


Month 4—A Whole Lot More Easy-Peasy Piecing!
This month you will be doing more chain piecing. My only rule for myself was to not worry about my fabrics looking good next to each other. (ok, so it still couldn’t be same fabric used twice in a block…) Just grab and sew. I found after about the first 3 months planning, I started getting the hang of this scrappy stuff! 

Nancy’s Takin' it to the Nines

You will need all of the dark and light 7.5” strips

Always press to the dark. I chain piece all of the sets, cut apart and then press.
Make 37 sets of dark sewn to light.


Sew a light strip to the dark side, make 13 sets


Sew a dark strip to the light side of the remaining pairs,  make 24 sets


Cut each set into 2.5” strips

Make two piles, (A) dark-light-dark strips and (B)  light-dark-light strips. Mix up the strips in each pile, remember, no 2 pieces of the same fabric in a block.
Sew a (A) strip to a (B) strip, make 39 sets.


Sew (A) and (B) strips to these sets to make 9 patch blocks.


Make 8


Make 31


I hope everyone is still enjoying the Mystery Quilt.
Happy Quilting!
Ann

Tuesday, September 8, 2015

Mystery Quilt Month 3 - Look Kevin, I Can Do Scrappy! and My BIG News!!

Before we get to the Mystery Quilt, I have some BIG news... I will be teaching at MQX New England next April. The classes are not listed yet, but visit the website often for future updates!  MQX New England


I will be teaching 3 classes, a hands-on Feather class, a Ruler lecture, and a Background lecture/demo. If you are anywhere near Manchester, New Hampshire, come see me. I love meeting Quilters and making new Quilty friends! 


Welcome back to my Mystery Quilt, "Look Kevin, I Can do Scrappy!"

Three months in and I'm excited to say, "ALL OVER THE WORLD!!" Quilters are stitching those pesky 1/2 square triangles thanks to me.  Ok, maybe not just because of me, but we do have an awesome number of quilters participating in our Mystery. I think Quilters in Australia are the furthist. 


I'm still waiting for more fabric pics......

As we start Month 3, remember - each month's directions will be posted on the 2nd Tuesday of the month, for 6 months.  If you or your local quilt guild would like to use my pattern for this Mystery Quilt, please feel free.  You have my permission to make copies for your guild.  All I ask is that you give me credit for the pattern  If you would like it in PDF format, please email me (atticthreads@yahoo.com) and I will add you to my email list.

If you missed any -       Month 1             Month 2


Month 3—A Whole Lot of Easy-Peasy Piecing!

This month you will be doing a lot of chain piecing. My only rule for myself was to not worry about my fabrics looking good next to each other. (ok, so it still couldn’t be same touching same…) Just grab and sew.  

This block is dedicated to my friend Lee Etta, who makes the most beautiful scrap quilts. She has tried to explain to me the "How-To's" of scrappy several times! I think it finally took.  

Lee Etta’s Corner

You will need                        76 of the 2.5” light fabric squares
                                              76 of the 2.5” dark fabric squares
                                              All of the 4.5” dark fabric strips
                                              76 of the 6.5” dark fabric strips

Always press to the dark. I chain piece all of the sets, cut apart and then press.

Set 1.  Sew a 2.5” light to a 2.5” dark, press


Set 2.  Sew a 4.5” dark to Set 1, press


Set 3.  Sew a 4.5” dark to Set 2, press


Set 4.  Sew a 6.5” dark to Set 3, press


You will have 76 Lee Etta’s Corner blocks measuring 6.5” x 6.5”.

Be careful to build your blocks on the proper side! Here's a picture of mine all stitched, pressed and ready, not stitched in the correct order! Easy to do, harder to un-do!


Don't forget, please send any pics of your fabric or blocks. My friend Kevin, the Quilter, sent me a pic of his cut fabric, blacks and golds! He's swapping the dark and lights. WOW, It's going to be stunning!


Shhhhh....While visiting my friend Susan, I found her Mystery Stash, cut, labeled and ready for sewing!


Happy Quilting,
Ann

Thursday, July 30, 2015

Mystery Quilt Month 2 - Look Kevin, I Can Do Scrappy!

Welcome back to my Mystery Quilt, "Look Kevin, I Can Do Scrappy!"

 I'm so happy to have received so many responses from quilters ALL OVER THE WORLD! I can't wait to see pictures of the finished quilts. In fact, I'm way to excited to wait. Sooo, I would love for some of you to take pictures of your piles of cut pieces for me to post, just a little taste of fabric for the rest of us!

As we start Month 2, remember - each month's directions will be posted on the 2nd Tuesday of the month, for 6 months. If you or your local quilt guild would like to use my pattern for this Mystery Quilt, please feel free. You have my permission to make copies for your guild. All I ask is that you give me credit for the pattern. If you would like it in PDF format, please email me (atticthreads@yahoo.com) and I will add you to my email list.

I've been asked to create a button for this Mystery Quilt and I would love to, as soon as I find someone who knows how to do that!

If you missed past month(s):       Month 1

Month 2—Let’s Get Piecing!

Since I made you work so hard cutting all those pieces last month, I thought I would take it easy on you this month. Just a little sewing, only 4 blocks to start.
I’m also giving you instructions to start making those pesky 1/2 square triangles. We won’t be using them for a while, so it will give you a couple months to finish them.

Lynn’s Fence

You will need 12 of the dark 6.5” pieces.
Using 8 of the strips, sew 2 strips together to make 4 pairs.


Sew a strip on to each pair to make the block. Press both seams in the same direction. Blocks should measure 6.5” x 6.5”. You will have 4 blocks.


You didn't think I was going to let you off that easy, did you? It's time to start those dreaded.....


Half Square Triangles

You will need 16 Thangles 2” strips. Cut each Thangles strip apart on the DARKER DOUBLE HORIZONTAL LINE, not the solid diagonal line between the dash lines! You will now have 48 Thangles patterns.

Using the 3.25” dark and light pieces:

Pair up a dark 3.25” piece and a light 3.25” piece right sides together. Pin a Thangles pattern to the pair and stitch on both DASH lines. Cut apart on the SOLID line.
OR
If you are using yardage for your background, use the 3.25” dark pieces and 9.75” light. Lay 3 dark pieces end to end on the larger light strip.
Pin a Thangles strip on top. Stitch all dashed lines, cut apart on all solid lines.

Remove the paper and press to the dark.

You will have 96 half square triangles. They should measure 2.5” x 2.5”.


But, don't freak out on me there. Remember, we won't be using these for a few months, so there's no rush. Although some of us have found them to be addicting!

Don't forget, send fabric pictures to share.

Happy Quilting,
Ann